A small "side" project
I haven't updated this page with anything meaningful in 11 years and yet it remains, according to Google analytics, the most popular page on my web site, followed by the second part of this treatise on gearboxes and transmissions. I never get any feedback, comments in the guest book nor email from anyone regarding specifics yet these 2 pages get more views normally than anything except occasionally perhaps whichever project page I've recently updated. At some point I'd like to know what the interest is so drop me a line if you have time! Jerry 04/09/2020
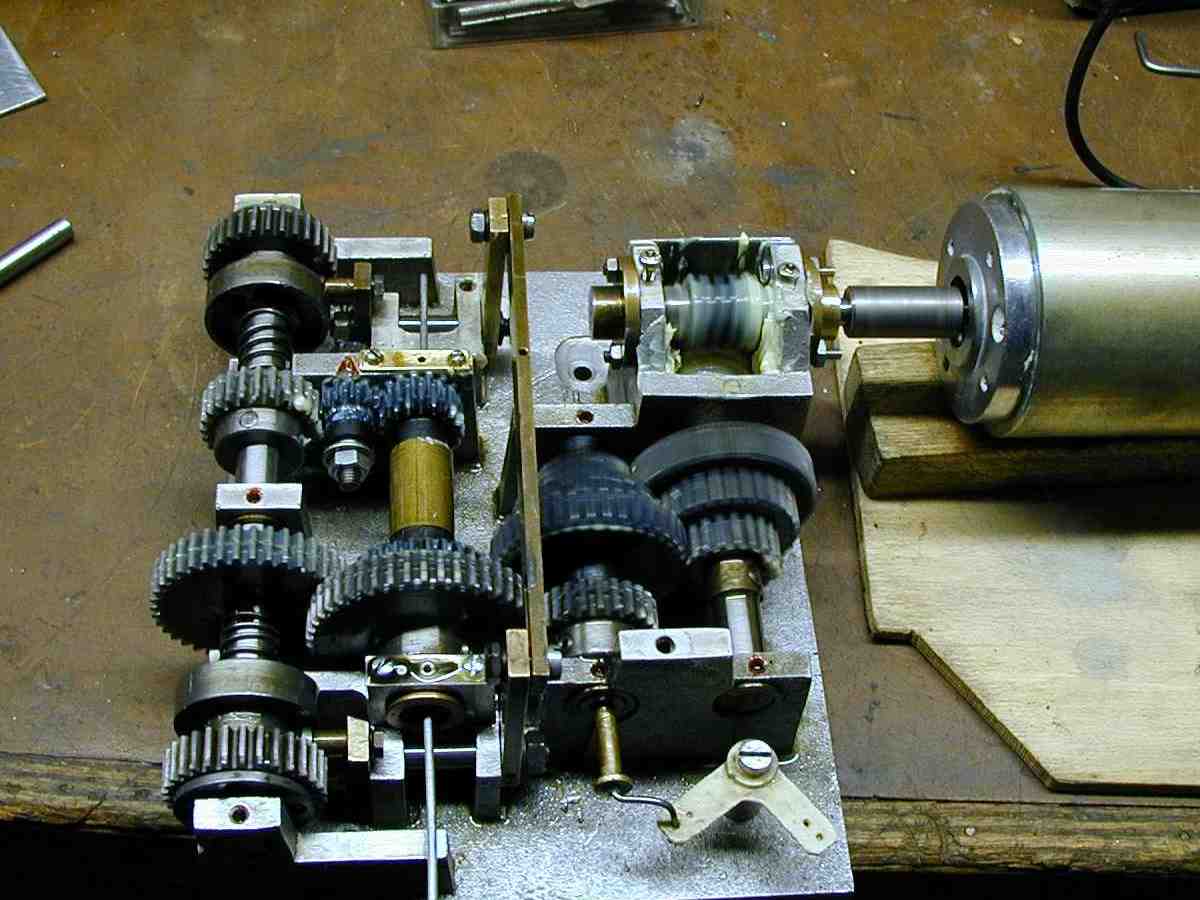
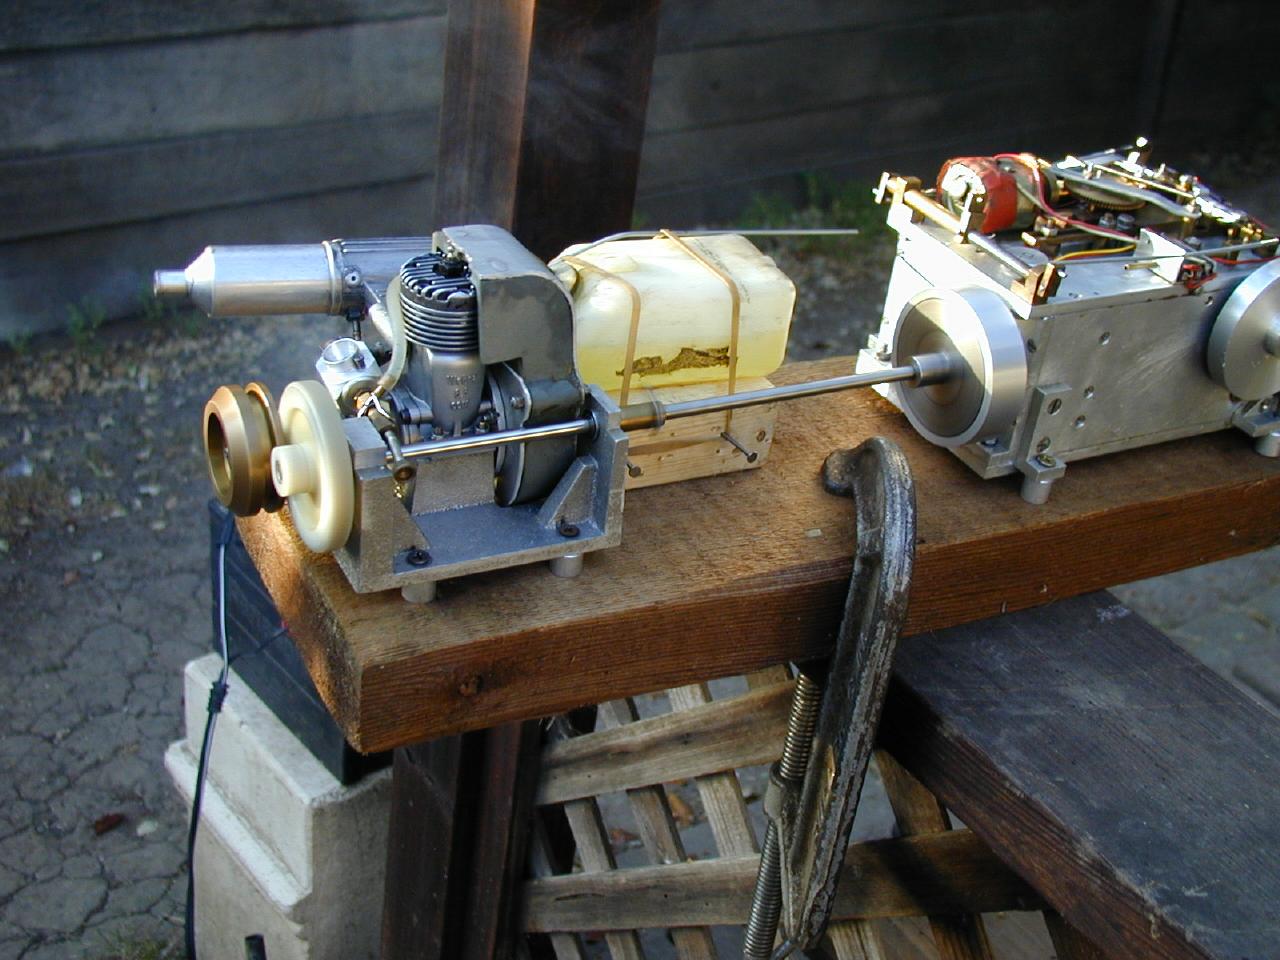
Some while back I found a very used tank gearbox which I believe was Jochen Maier's first gearbox offering. I don't really know alot about this gearbox and when it was first offered except that is a clever design that doesn't really seem to work very well. In theory it offers 3 speeds forward and reverse. I'm just posting this to get this article moving and I will cover just what I did to rebuild it so far and how I believe it is supposed to work in the next few days. This photo is of a test run I've just done powered by a large electric motor running around 18 volts. -jc
I'd REALLY like to hear from anyone who has experience with this gearbox. At this point I'm more or less looking at this as an artifact!
For comparison here's a later style 3 speed gearbox Jochen offered after the one above. It was this one that I first bought in 1977. It is a three speed forward 1 reverse gearbox and works very well. I will also cover this in a little greater detail. 06/22/2002- I am waiting for my digital camera to return from the repair facility so I can ad more content to this coverage of gearboxes.....
A small "side" project.. Phase II
Some months ago ( this being 07/27/02 ) I received a 1/10 Seiki Tiger I that was in a state of disrepair. The first order of business was to repair and renew the gearbox. I show it here in its orirginal condition. This a close up photo I sent to a fellow modeler to show the initial input side of the transmission. I will post other photos later as I have already completed the rebuild. 08/07/2002 Once again I await the return of my Digital camera as it failed again. Words to the wise: never buy a "refurbished" digital camera as an attempt to cut costs!

More on the Seiki rebuild to follow ( 10/13/2003) and here it is! 01/08/2010 just a few years later! While I was researching shift mechanisms for my own gerbox I pulled out this Seiki which I had not touched for some while. While I looked at it I decided to finish the last thing outstanding on the mechanism which was to finish the shoes of the side clutch. The originals which were missing on this example were lead filled for extra weight. So I bored two holes and pured molten lead in them. The weight was close to the originals so I called it good. I'm not sure was this clutch actually does. Probably if I saw it diagrammed or in action it would be clear what its purpose is. As I find many times it is difficult to determine a mechanism's function when static instead of in dynamic motion in concert with other parts.
Below is the completely restored gearbox. I substituted a plastic section in place of the neat thin aluminum sheet cover and included two places where I can add oil. The originals di not include this.

Here is a photo taken today, 10/13/2003 of another Maier 3spd gearbox I'm renewing; renewing because I wound up peening 3rd gear and the resultant burr on one tooth got me concerned. Third gear ( the driven side) is the small gear on the far right of the 4 gear cluster on the shaft at the top of the photo. Actually it wasn't that bad but as it turns out I was looking for an excuse to take one apart which I've never done! The gearbox needs cleaning and resealing. I've cleaned up the gear but I'm going to go over all four gears( reverse also ) as I see some peening on all of them but very light; it probably accounts for occasional stiffness getting the model into gear. Peening or grinding the gears is almost inevitable with this design unless you're really careful; It's not a simple box to change gears on; especially during the excitement of running at an event; all the more embarassing as I was all by meself when this happened! In my defense the problem was caused when the shift linkage went AWOL causing the selector motor to continue running; at one point it was attmpting to jam the gearbox into gear while the engine was running at speed. That's a problem in that above the engine noise you can't hear what the gearbox selector is doing. This gearbox version is different from that seen above: the one above is of the manually selected early version; the one shown here is the later electrically shifted version...
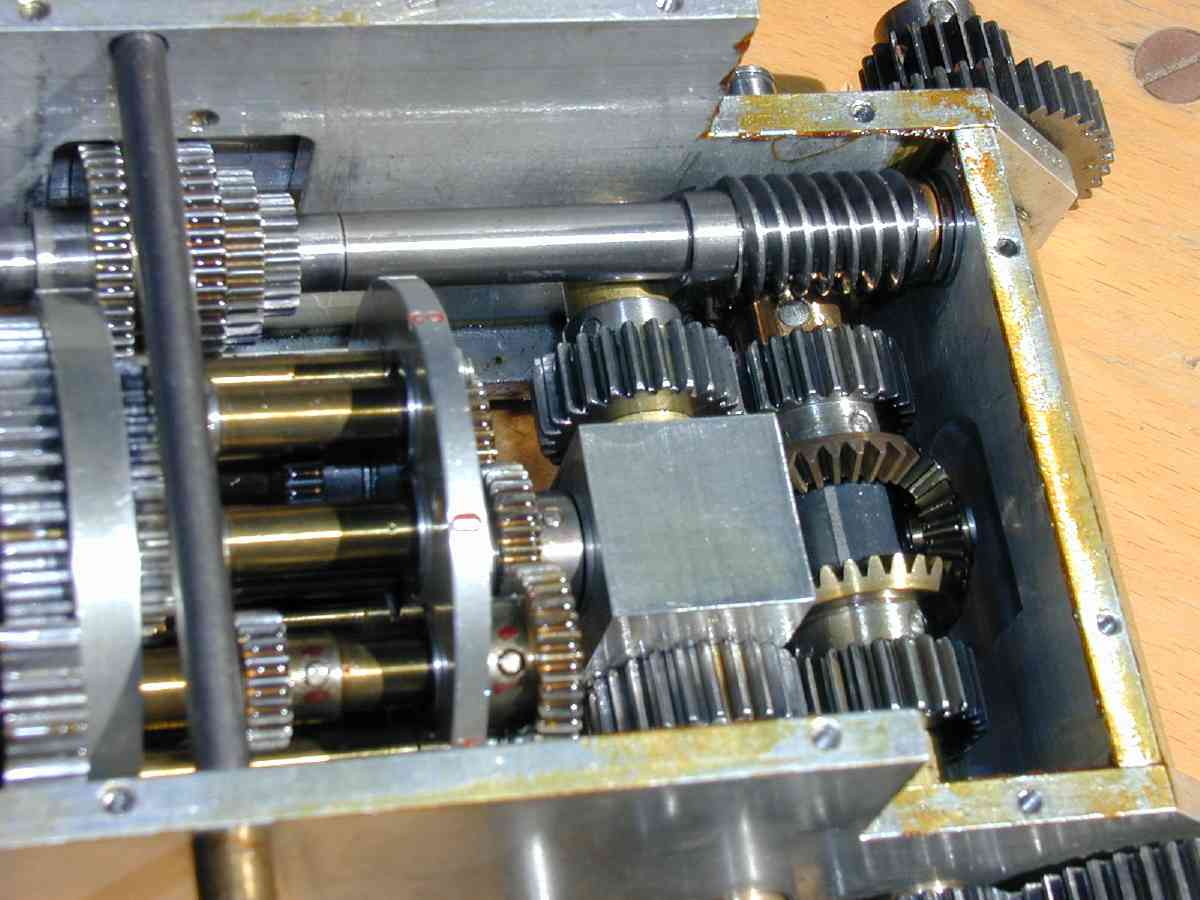
In this second photo the differential gear may be clearly seen as well as the driven gear ( to the right of the differential) from the worm gear drive which applies the power from the selected gear to the differential itself; the steering brakes have been removed.

The third photo shows the gear cluster shaft by itself; notice the semicircular keyway in the shaft and the corresponding semicircular cut in the gears themselves. A small length of rod serves as the key. It is the same for the worm gear on the opposite end. The assembly is provided with ball thrust bearings on each end of the shaft which is retained between the two end plates of the gearbox. Again it was minor tooth damage to the small ( 3rd ) gear on the left of the cluster that prompted me to do this disassembly.

I am continued to be impressed by the quality and robustness built into these gearboxes in particular and the entire model system in general. I have no doubt that properly maintained one of these models will be something your children could inherit!
The following photo is of the gearbox after cleaning up the gear teeth, cleaning in general, resealing and reassembly. I'm still fighting with the logistics of getting spare gears, not due to availability but the atrocious policies of the maker's American representative. Example: a 20 tooth 0.7 module simple gear which is priced at roughly Euro 6.50 (~ 7.10 USD) on the maker's website( plus VAT and postage if you're in Germany) costs $26.00 ( plus postage ) from the American rep to my supplier; in finance this is caled usury! I don't mind a fair mark up but this is ludicrous AND I was told they were very rude and unprofessional to my supplier, Bearing Engineering who has always gone to bat for me, good people. Anyway I rant! Enjoy the photo. I will be relocating all of the transmission photos to their own page to save space and load time.... One last note: you will notice that I did not scrape off the reminents of the poriginal sealant from the plastic cover, you'll see it in the photo; somehow I was worried that I'd score the plastic and make it worse so I decided to leave it alone. The downside is it apears as if I didn't do anything cause you have to look close to see the clear silicon rubber I used to reseal the lower parts.
Upon resealing/ reassembling the gearbox I put in an appropriate amount of oil as this is an oilbath gearbox, up to about 1/2" or so( you know you've overfilled when it begins to seep through some of the mechanics). I wanted to avoid the thick automotive oils so I used a high end air tool oil of about 20- 30 weight. There was an interesting and illuminating article in Model Engineering years ago from a fellow who made a glow powered Landrover model; When he went to run it the first time he found it had no power; he realized that most of the engine's power was spent churning the thick oil he'd used so he changed to a lightweight oil and sure enough that did the trick. A lesson that sure stuck with me! I did a test run of the complete model selecting through all gears and it worked devinely! ......jc 11/03/2003.

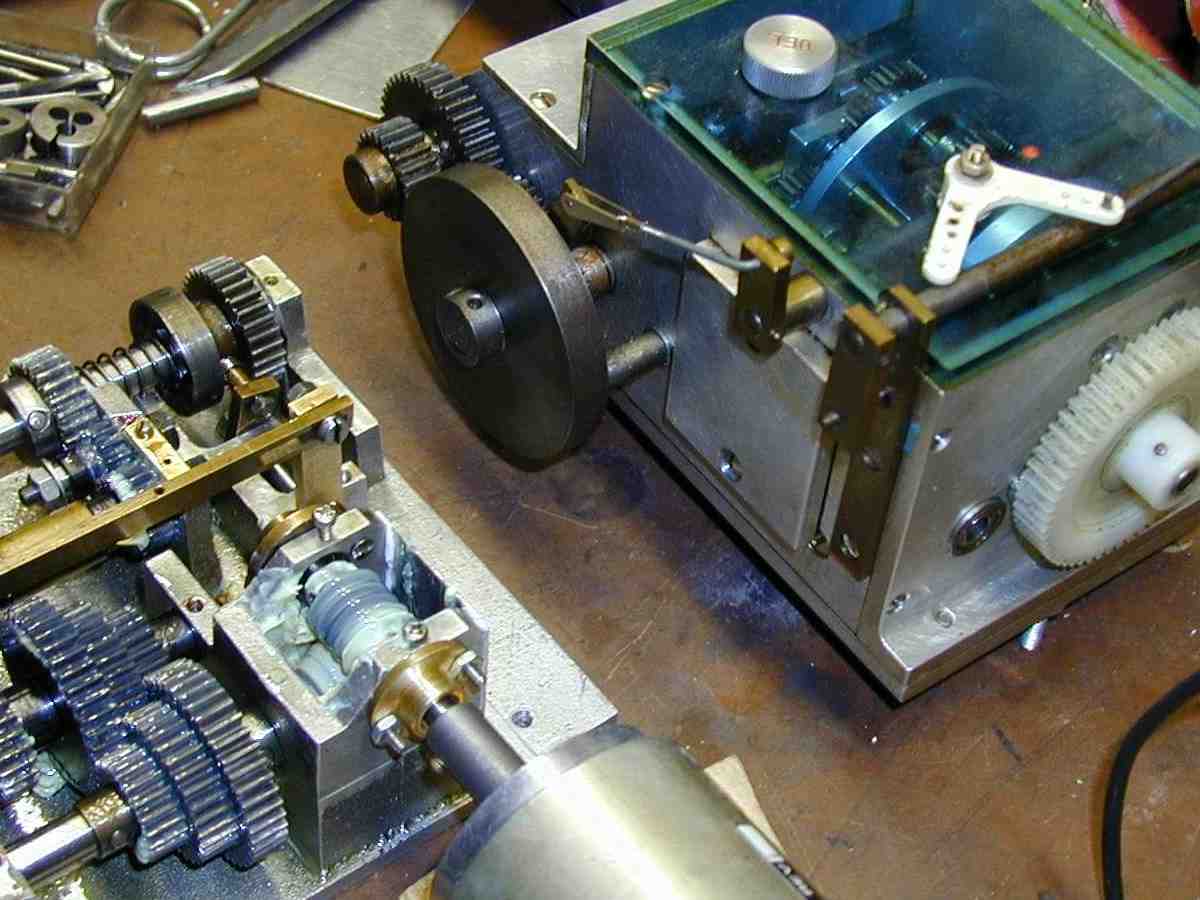
April 17, 2004 - As I mentioned on the forum I recently acquired another form of Jochen Maier's 3 speed gearbox. This one apparently being a rare one as he only made 3 examples so he told me a few weeks ago. I've pictured it here in the final stages of rebuilding it. I wanted to take photos of it while I had it taken apart but generally I find myself working on these at night ( late at night usually ) and with little time during th edaylight hours to take photos. Sooooo rather than wait til weekends I went ahead and put it back together. I will take the top off at some point in the re-break-in period so I'll try to take photos then. The bottom, rear and lower front plates have been cleaned, resurfaced and sealed so they won't be taken apart til some future rebuild if required. As I mentioned on the forum this gearbox had had substantial violence visited upon it. In summary what I did to repair this:
I actually enjoyed this work. At the moment the gearbox has about 5/16 deep oil level in it; Sta-lube air tool oil. I'm going to power it up hopefully soon. I am hoping I can at least use it for one speed forward and reverse, somehow I think it is too complex to work smoothly but I'll see. The pivoting shaft is a bit too stiff I think and I suspect the bent shafts I replaced happened because of the unit's pivot action: I think the shafts can become bent if the gear teeth don't mesh and it attempts to move the shafts back into running position; I believe the mechanism will attempt to force them back together. One other thing: I decided to reverse the orientation of one gear the driven gear ( driven by the input gear) to be closer to the supporting post which pivots hopefully for greater stability: this required elimination of the dipstick Maier originally had on the oil filler cap...
In some ways after considering that wonderfully complexand exposed mechanism I'm reminded of a Luger ( P08 ) pistol: wonderful to look at and works very well under clean conditions but get it dirty and it comes to grief! Let's hope not. It would be wonderful to see this thing work well!
I've included 2 more photos from different perspectives. That's all for now...04/22/2004.
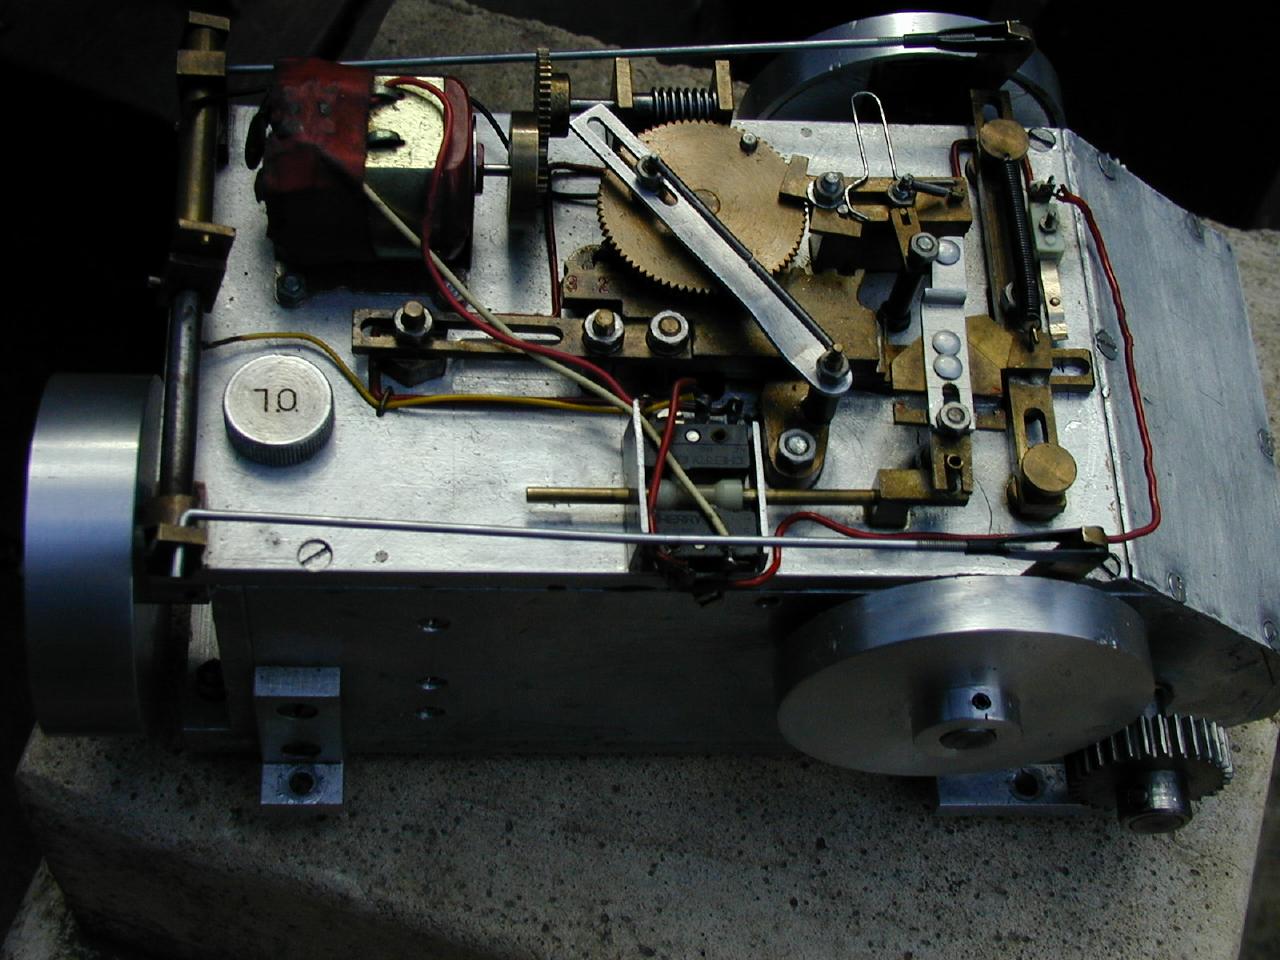

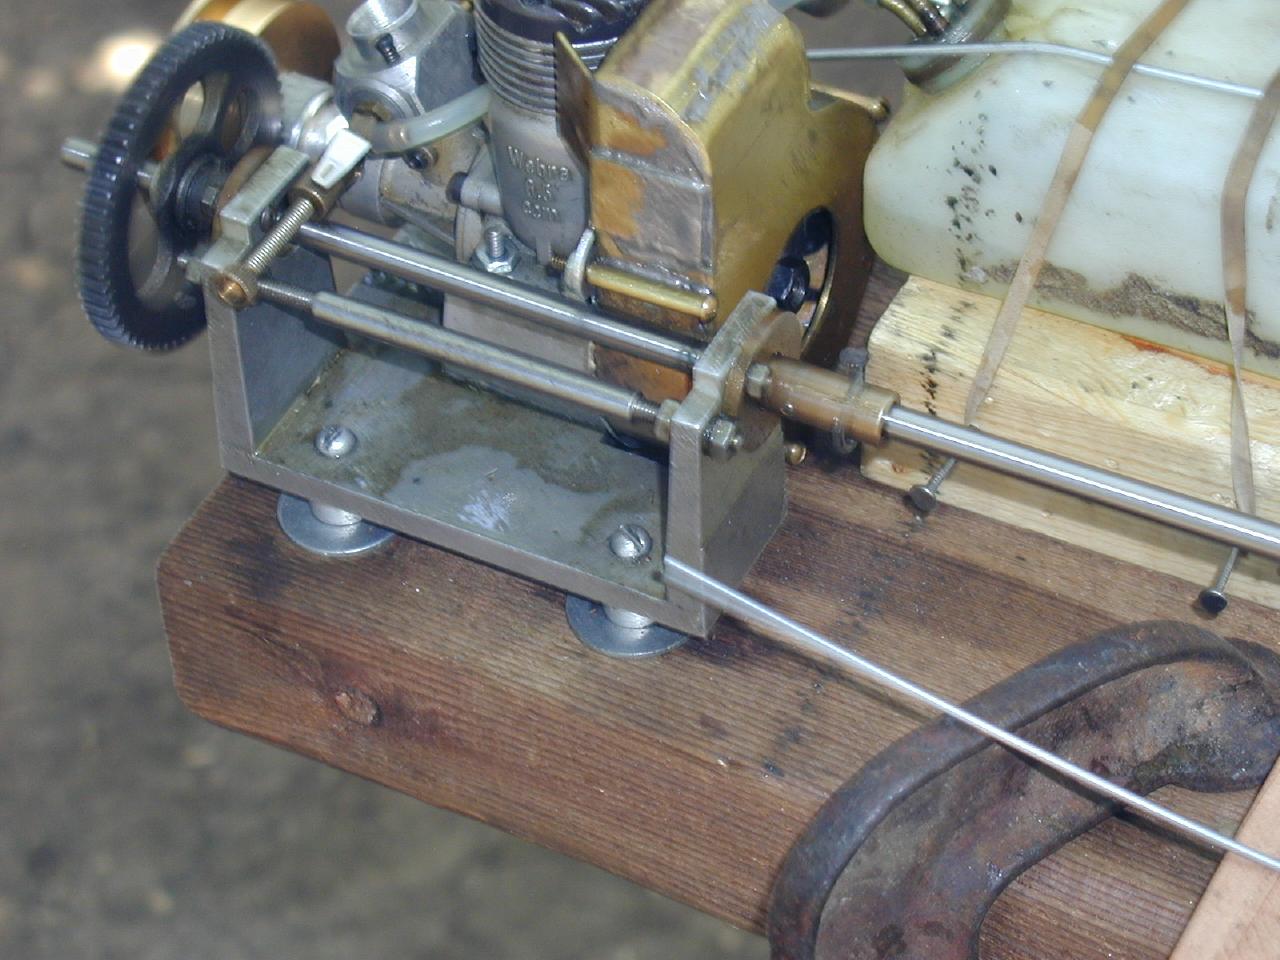
And finally a run- up test! Today in the afternoon (04/25/2004 - gads it was hot wasn't it!) I mounted the gearbox and the engine that came with it and ran it for about 4-5 oz o fuel ( 200 ml? ). I'd previously stripped the engine completely apart and cleaned it; although in all honesty it didn't really need much. The ring was stuck in the piston groove but other than that the engine does not appear to have seen excessive run time. I never try to run a strange engine without going through it; especialy one of these special aircooled ( integral fan) Webras. The first time I started it, it fired within a few cranks. Same thing today; idle isn't what I'd like yet but no lack of power. You can see the driven plastic gear ( nylon, delrin? )by the engine is a blur as is the clutch. Notice if you will the custom, high precision bent nail- pin used to couple the engine to the clutch shaft! ( it is the odd blur at the end of the brass coupling. Well as I said to my lady Patty: " nothing flew off " so it seems to work so far. It was set in second gear, so even at full throttle my camera's shutter speed was too fast to make the output gear a blur :-( . I'm going to open the gearbox up and look for anything obviously bad after this run. If you are wondering; "why is the fuel tank sitting on the woodblock?" I think that many folks who try gas tanks run into grief in part because they overlook a simple rule: the centerline of the fuel tank must be at the centerline of the engine's carb to function properly; unless of course you pressurize the tank using exhaust pressure or use a pressure actuated fuel pump. I've never liked pressurizing the tank; simple proper position has always worked well. It is a compromise I suppose; it works best at one precise time with respect of fuel level in the tank; towards the bottom or when full the performance is different. Perhaps we who operate tanks don't notice the variation the way a flyer would.. I can't tellya how many problems simply properly mounting the fuel tank has fixed. While running I tested the brakes which worked great although with no load on either shaft they tend to move when they want! Also I tried to detect any vibration and I really could feel none. I was happy that it all worked well. That's it for now..
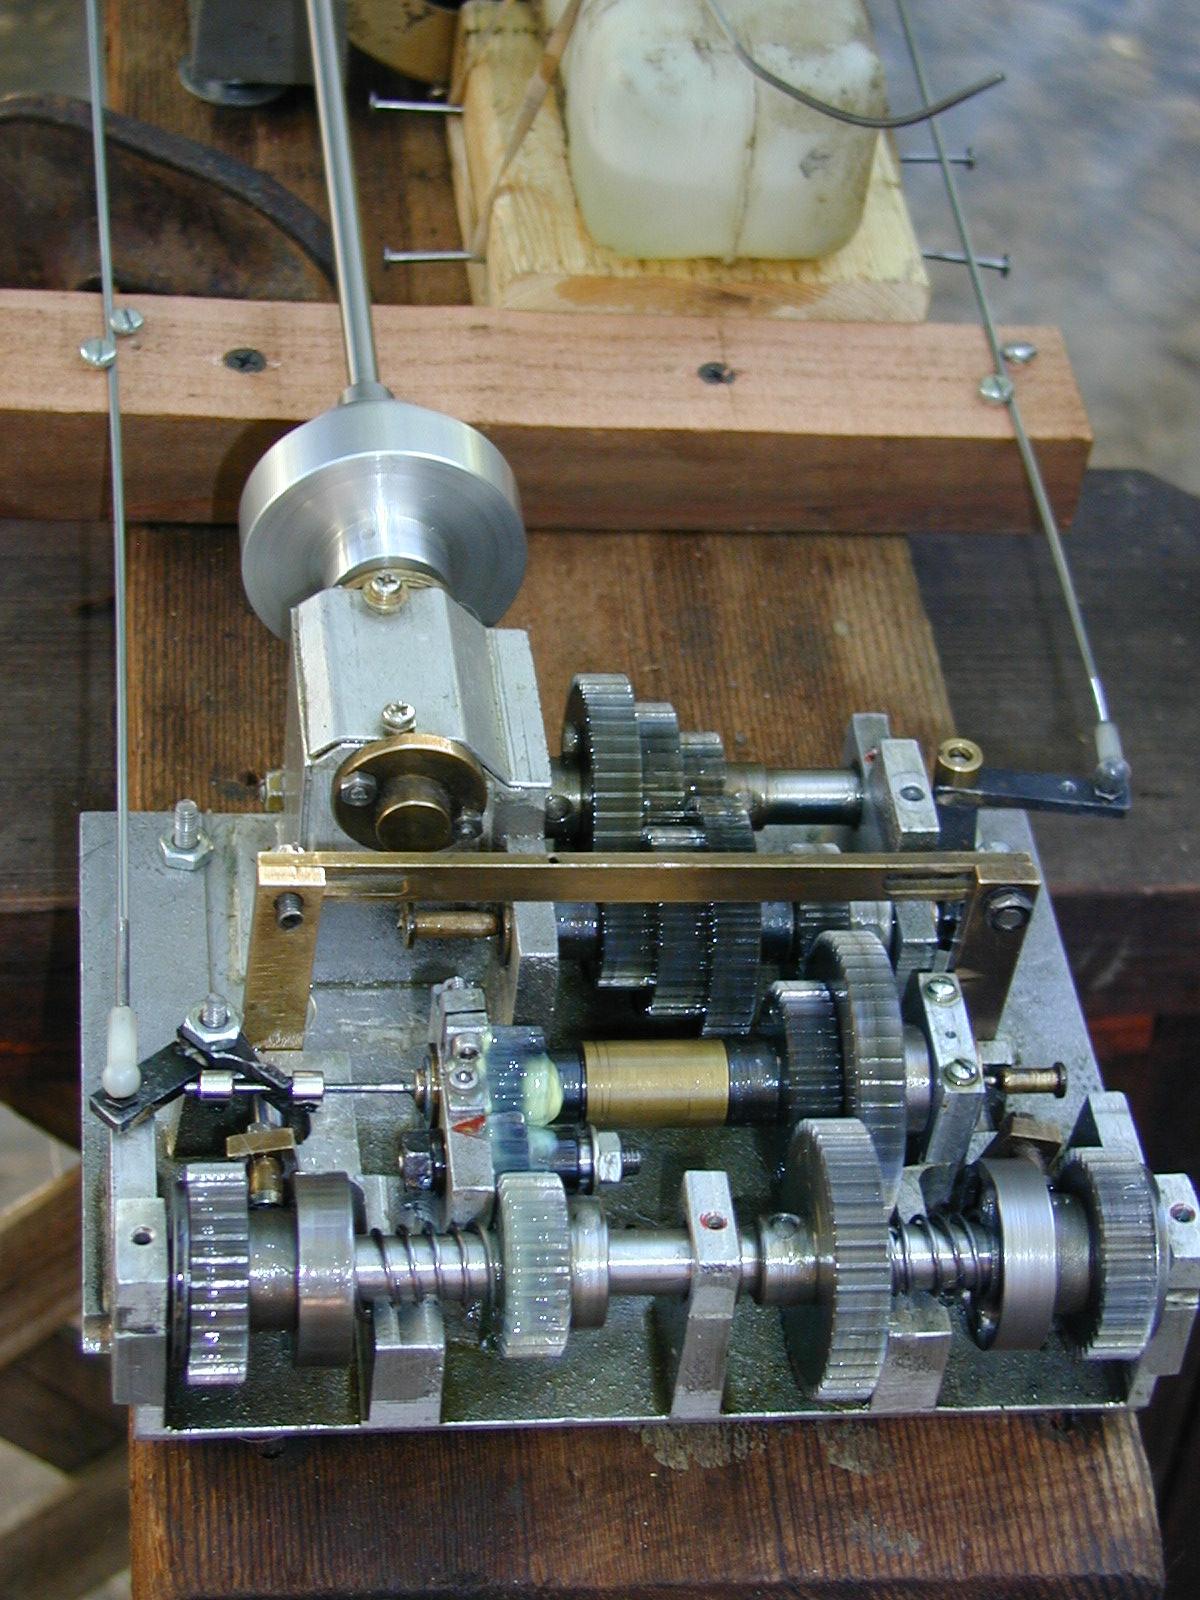
May 9, 2004 At last I believe I've got it after repairing the shift mechanism. At least all that I believe I can do from what is apparent. I want to re wire the top at some point but it can wait. I ran it again, made a video of it and it seems good and shifts so that's all I can do for now. I want to get back to the very first gearbox on this page to see if I can get it to work without breaking under the power of the webra 6,5ccm engine I have for it...
June 12, 2004- Success! I have successfully run under power of the Webra .40 that originally came with the first gearbox I display at the top of this section. This the open 3-speed gearbox I believe to be the first offering by Jochen Maier. Notice again if you will the familiar high tech nail used to connect the clutch drive shaft to the engine. On the engine I had to mount a fan and build a fan housing and back plate as it never had these parts. I also modified the flywheel it came with to actually work with the engine. When I purchased the gearbox/ engine I quickly realized that these were a "work in progress that hadn't progessed very far. There were multiple aspects of the gearbox I had to remake or repair. I don't know how practical this gearbox is in actual use. It is curious to look at and interesting to watch in operation but it is unsophisticated in turning ability. With the various versoins of braked differntial type gearboxes you can still make a fairly graceful or sharp turn as you wish with skillful use of the brakes; no so with this one: there is no slipping of any brakes. There are no brakes only engagement drive dogs that are either engaged or not. Once a track would be disengaged only a sharp 90 turn is possible. There are three photos of this setup on page 197 of Gerhard O.W. Fischer's "Ketten Fahrzeug Modelle" ( 3rd edition ). It is installed in a Panther. I have an idea for a model to install it in: slow moving, not highly maneuverable. For now see the photos below.
Rounding out the gearbox presentation I show here a gearbox which I believe was originally made by ModellBau Veroma in the 1980s. I don't know much about it; I don't know if this is the original configuration or not. The electric motors are huge, I think way large for a 1/10 scale model. I believe they, ModellBau Veroma, offered both 1/10 and 1/8. I am sure they offered a 1/10 Tiger. I had their catalog once but they were very expensive. This gearbox is very notable in that it is a dual or cotrolled differential type that does not use brakes for steering. Instead it uses the secondary differential , on the left side of the gearbox to effect steering. One can cange the rate of steering by the amount of power you supply the secondary differential. It is a very remarkable design. I am never sure of the proper name of this type but if you know please let me know. There is a thin plastic cover on the central section which I removed for this photo. The gearbox has an odd thin corrugated botttom which doesn't seem to support an oil bath. The oil needs to be thin in all these gearboxes and is difficult to retain. Part of the 'charm' of higher powered models...

The following photo is one of the Sankyo gearbox as used in their model line. This is used in one form or another in their 1/12 King Tiger, 1/10 type 74, 1/8 scale type 61 and I believe the type 90 I believe they made ( still make?) for a while but I've never seen one. It is essentially 2 gearboxes in one housing; relatively simple and it functions very well ( can make neutral turns) but is very intense gear-wise with 30+ gears reuired. This example i actually missing its output shafts, the one there is just to line things up for the photo. The input shaft is lying on the small piec of wood on the right. When included with a model kit this gearbox has plastic covers for the body of the mechanics but the gearbox relies on greased lubrication as it does not run in an oil bath. Steering and forward and reverse is effected by use of the twin control arms seen on either side of the midle of the gearbox. Actually a very strong gearbox; it is capable of dealing with either electric motors (300W-?) or glow/gas engines from 5cc to 30cc and models from 30 - 114 pounds(15 - 56kg).

Early Maier single Speed gearbox
From my friend Oliver in Germany comes these next two photos of a fine example of Jochen Maier's single speed gearbox. I believe this was contemporary with Jochen's three speed gearbox I showcased earlier on this page; the one with the aluminum top plate. I know minimal information regarding Jochen's single speed gearbox as I've only seen them in photosl; and none as close up as these. Jochen at one point made two versions of single speed gearbox, one with forward only and another with both forward and reverse. I just can't believe the forward only version was very popular nor will I ever see one. I have not confirmed this with Jochen but I believe that his three speed gearbox was his best seller. I believe that he dropped the other options and simply focused on the three speed. At some point I'm going to scan a copy of his prospectus from the earlt 1980s which shows these. Many thanks to Oliver for these photos.


Late Maier single Speed gearbox?
The next photo is one I basically "borrowed" from an ebay.de auction for a Maier Panther A. The Panther model it was mounted in was unremarkable in itself but the gearbox is interesting in that it is of a later pattern and would seem to be a single speed type although I can't see the reversing lever. The carrier for the gears also seems smaller than the 3-speed version. Clearly the gearbox input was modified to use a tooth( timing) belt type pulley / belt using power from a electric motor. The output gears look somewhat different, one being thinner than Maier's standard gearing but without the gearbox in hand it is difficult to say what is original and what is not. Most curious. Jerry 10/29/2009

---o0o---
---o0o---